
Free Email Hosting For Small Business
Unfortunately, when starting a small business, the start-up costs can add up very quickly. We have discussed in the past how to save a little money with the creation of your LLC or corporation, now let’s take a look at how to avoid paying unnecessarily for business email.
This solution to free email hosting depends on an assumption about your business which is that you already have a website or you are going to buy website hosting when you launch your business. Even if you have a brick and mortar business where a website will not be a major channel for you, nearly all businesses these days have some sort of website.
IMPORTANT: if you don’t have a website and you do not plan on buying one, then this free solution will NOT work for you. This option requires that you have a website and it is hosted with a hosting company.
Here’s how it works:
The first thing you need to do is log into your website hosting provider. In this example, we are going to use Hostinger to demonstrate. This process will be slightly depending on your hosting provider but the concept is the same. We recommend Hostinger because we’ve noticed their shared plans have the best “bang for your buck” value. However, nearly every major hosting provider will give you this option.
Create Email Account
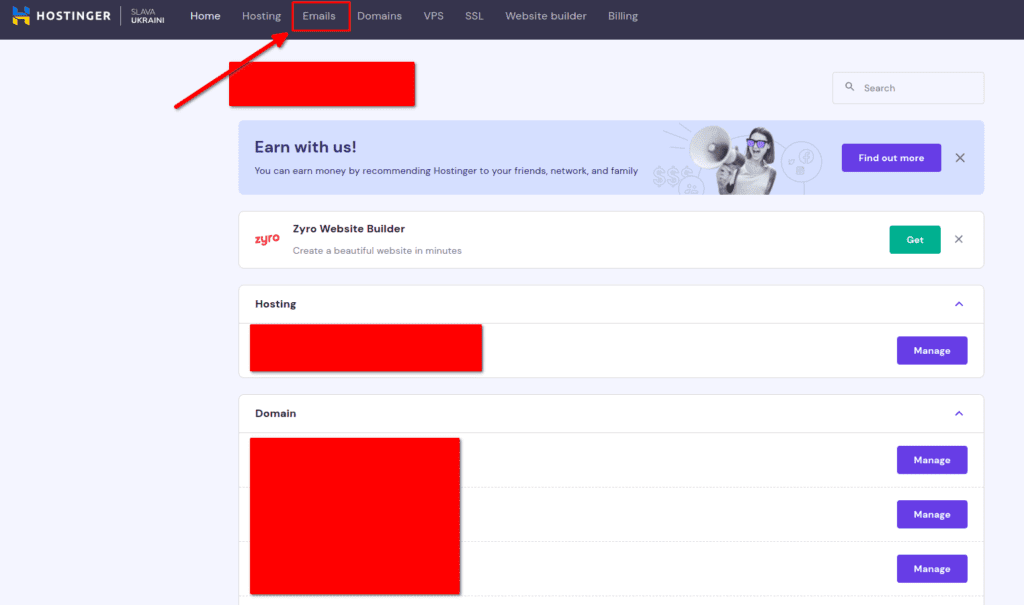
Step 1: Log-in to your web host
Step 2: Navigate to a section named “email” or “webmail” or something along those lines.
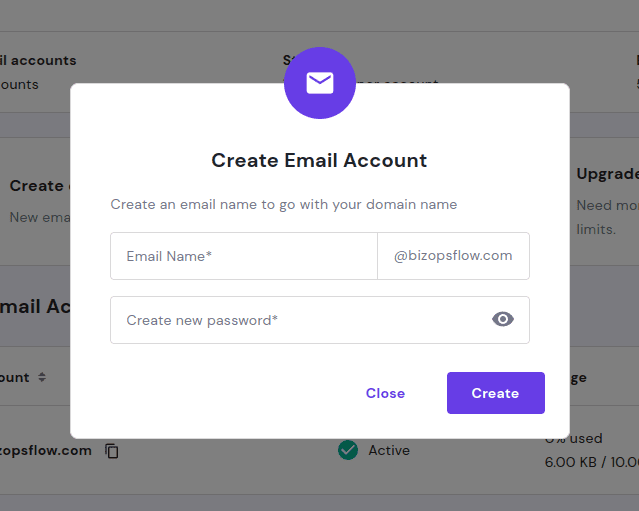
Step 3: create alias & password
See the image below for what this looks like on Hostinger. Do this for yourself and any employees or contractors that you have. If you are the only one that works for you company, it’s probably a good idea to have one additional, generic email alias like support@yourbusiness.com. We will show you how to forward these email accounts to your primary email (if you want) later on. Alternatively, you can create multiple aliases for the same email inbox (so you only need to log into one) which we will also discuss.
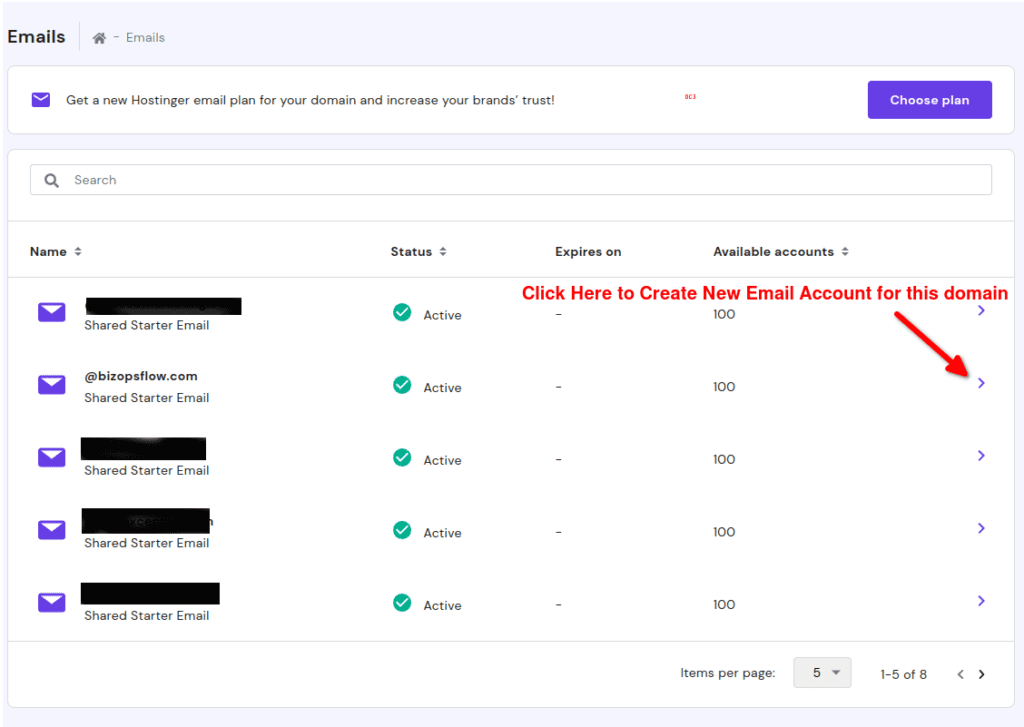
Move your cursor over to the the small chevron arrow on the right of your screen that aligns with the site for which you are creating a new email …. click on it. From there, you will see a menu and select “create new email”.
>> Notice on the top right of the screen Hostinger is trying to sell you a premium email plan? You don’t need this starting out. Undoubtedly, other hosting providers will be trying to sell you something similar, but don’t take the bait.
The next screen you see a pop-up or screen that is asking you to create the alias and password for the new email account.
Ok … the first half of this process is complete. You now have a functional email address and inbox that can send and receive email. It’s important to remember that where you access this email account and the username and password are different than the password and URL for your web hosting plan. One is for your hosting and the other gives you access to an email account. They are two different things even though they are both managed by Hostinger (or whichever web hosting provider you use).
Remember your email username and password because you will need these log-in credentials in the second half of this process.
Part 2: Email Client
Now you have a functional email inbox and you could technically stop here. However, these webmail services are extremely “bare bones” without many of the features that you are used to having in email (whether you use gmail, outlook or something else). We can upgrade this email service by using a free email client.
In this example, I am going to show you how to do it using a free and open-source email client . Free and open-source software (“FOSS”) is usually preferred because you can be more confident that there is nothing malicious hiding in the software (spyware for example). With that said, there is no reason you can’t use another email client (for desktop and mobile).
For example, if you have a mac and an iPhone, you can use the mail client that is pre-installed on those devices developed by Apple. The process will be more or less the same as the one I describe below.
Step 1: Download Thunderbird
If you have never heard of Thunderbird before, it’s developed by the Mozilla foundation (the same group that develops the Firefox web browser). The desktop client for Thunderbird is well supported by a rock-solid group of developers — so you don’t have to worry about it being discontinued any time soon.
You can download Thunderbird from the Mozilla website, but it’s probably a better idea to download it from the app store on your computer. By using the app store, you will be reminded to download updates when they come up.
Here’s a photo below of what to look for in your app store. You likely use Windows or Mac but the photo below is taken from Zorin OS app store (a Linux distribution).

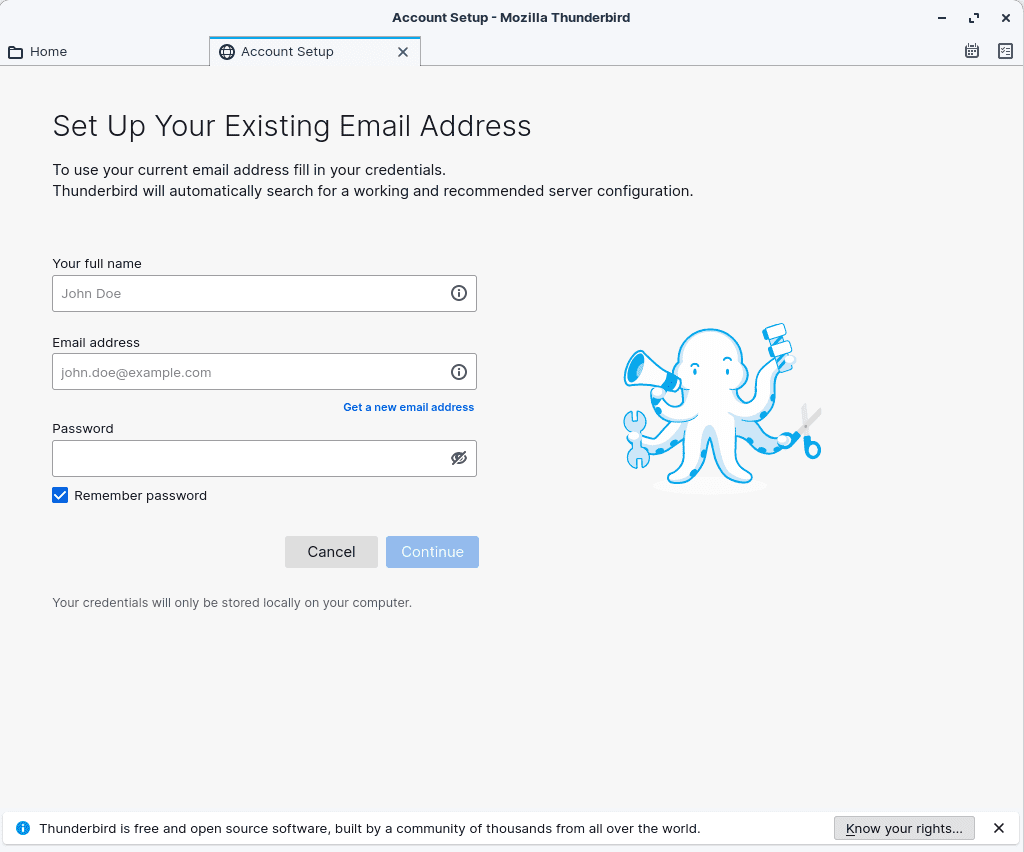
Step 2: Add Your New Account
Now you have Thunderbird on your computer, but it’s an empty inbox because there isn’t an email account linked to the email client. To do this, navigate to the part where it says “add account”. Now is the time where you’ll need that email username and password that you created when you created your email alias in your web hosting provider. The add account page will look like this:
Step 3: Manually Configure Your New Email Account:
This next part is a little tricky but not much. The way Thunderbird works is that it assumes you will be logging in with one of the common email providers like Gmail, Yahoo or Outlook.com. For these common email services, it has all of the configurations saved already so all you have to do is enter your username and password.
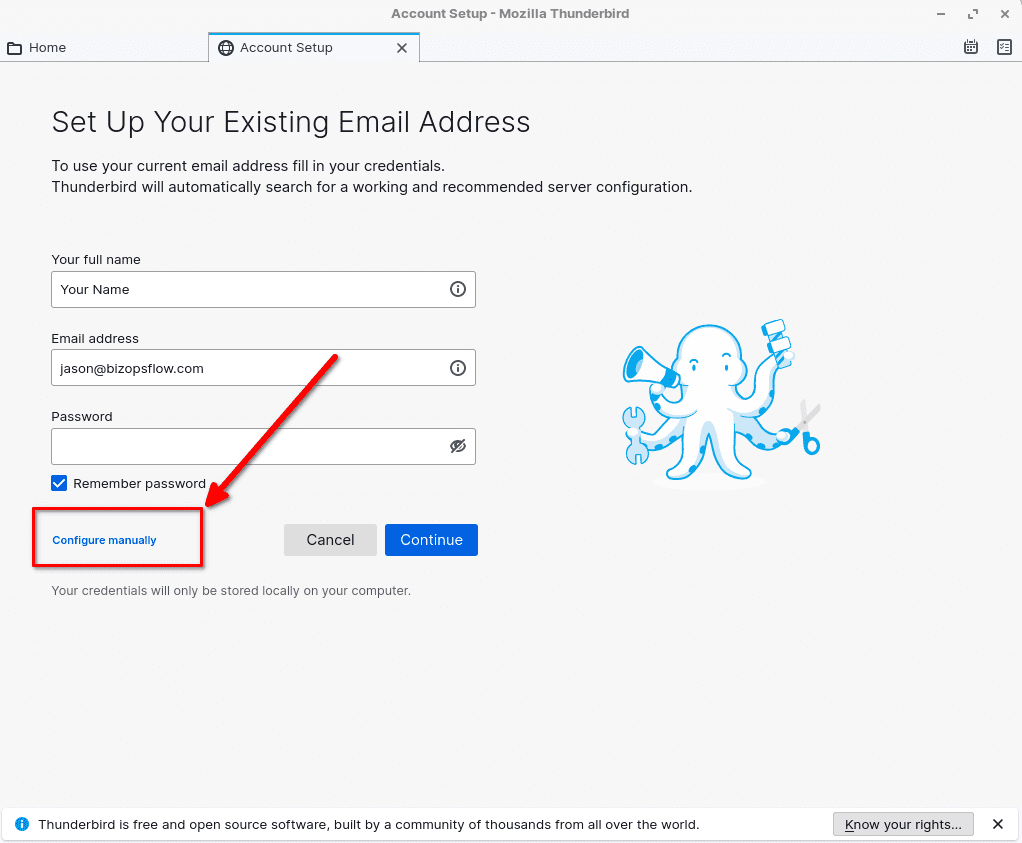
However, if you are not using a common service, it will recognize that it’s different as soon as you put in your username. Then it will give you an additional option below “Configure Manually” that I have boxed in red and with the arrow in the screenshot below.
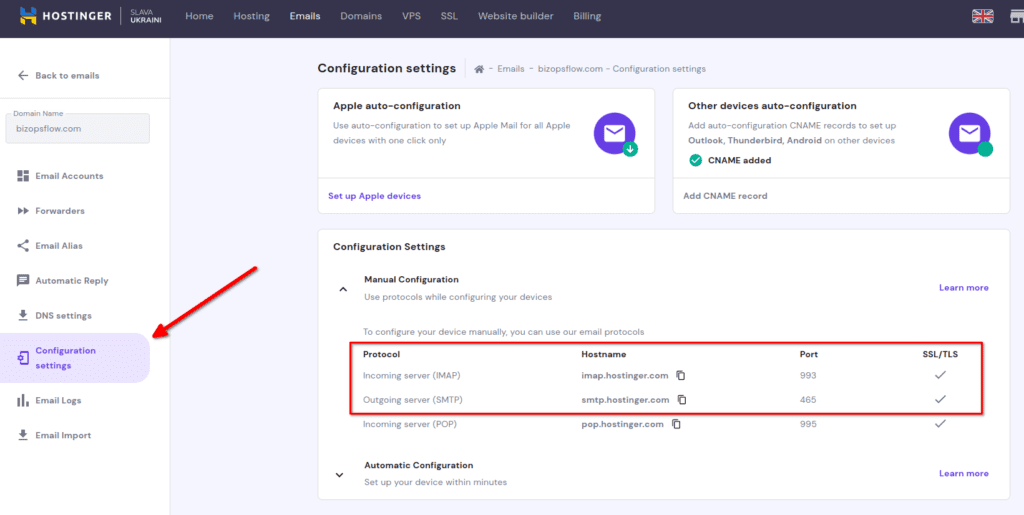
From here a new screen will open up that gives you more information to fill in regarding the protocol and configuration of your email account. You get this information from you web hosting provider. I copied a screenshot from the Hostinger dashboard. On Hostinger, it’s called “Configuration Settings” under the Email section.
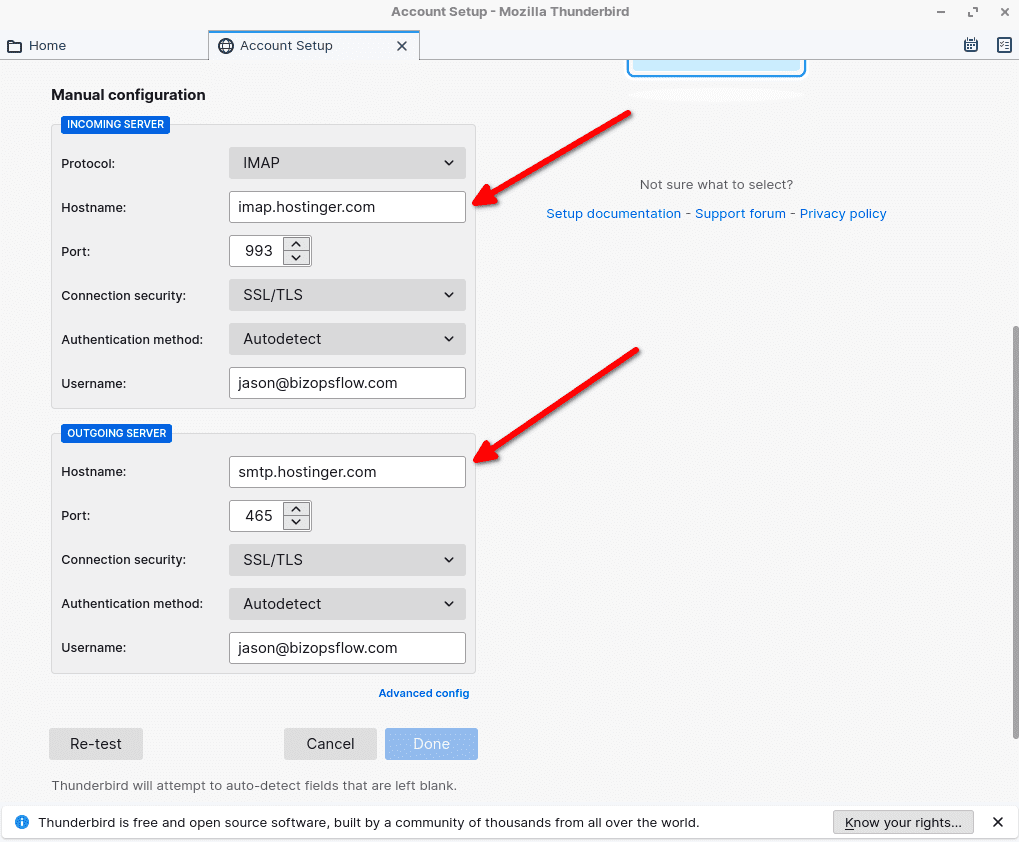
Here’s the part that gets a little tricky. Thunderbird will auto-fill the “Hostname” fields with the same domain as your email username (in this example, it would be BizOpsFlow.com).
However, you need to put in the Hostname of your web hosting provider, not your business’s domain. All you have to do is copy the server exactly as it is shown on your web hosting provider’s manual configuration settings.
You will see in the screenshot below how I copied exactly from the manual configuration settings (as shown in the screenshot above) from Hostinger into Thunderbird.
That’s it! You now have a free business email account with a fully featured email client for you to use.
That may have seemed like a lot of steps but I promise after you do this once, you’ll be able to get it done in less than 5 minutes if you get a new employee or contractor.
Email Forwarding & Email Aliases
Before we move on to setting up your business email on your mobile phone, you may want to include the following steps regarding setting up an email forward and setting up additional email aliases.
If you already have a primary work email that you use most of the time and you don’t want to add another email account into your workflow, then you can set up the new email account you created for your small business with a mail forward that automatically directs all emails to your primary email inbox.
Before you dive right in and add an email forward to your account, you might want to think if this is the best idea. For example, if you are trying to forward to your personal email inbox, then you might be asking for a headache in the future. It’s only a matter of time before you respond to a work email with your personal email alias and it will likely cause confusion for the person you’re communicating with. Not only that, the person will forever have your personal email saved in their email service and every time they type your name, there will be an autofill with your personal email address (rather than your work email).
This is your choice how you want to manage your email accounts but if you decide to set up a forward, here’s how you do it:
Go to the same screen we accessed before on your web hosting provider (in this case, Hostinger), and click on the three dots on the right next to the email account — shown below.
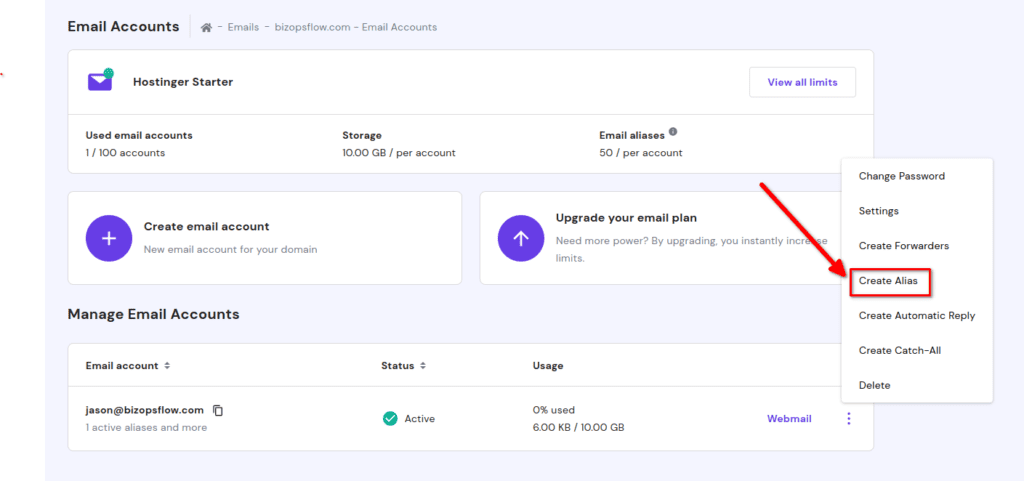
In the screenshot above, you will see that I have highlighted the option for “create alias” which is what I will explain next; however, you can see the option above that is “Email Fowarders”. Click on that option and you will see a screen that looks like the one pasted below:
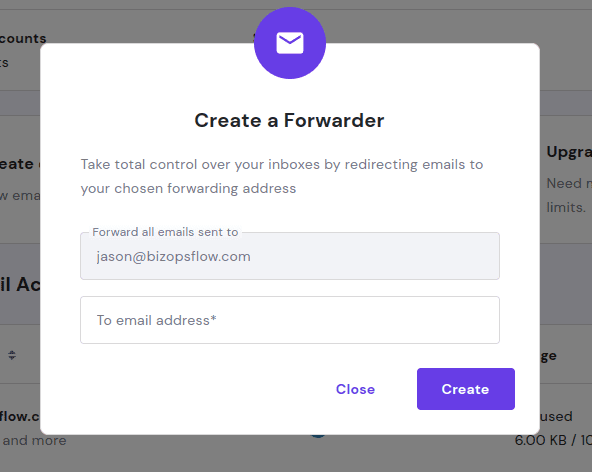
You know what to do from here. Simply put in the email you want to forward to and you’re good to go.
Now let’s talk about aliases. In some cases you might want to create a new alias rather than a new email account with a completely separate inbox.
What is the difference between creating a new email account and a new email alias?
When you create a new alias, the emails sent to that email address will go to the same email inbox. For example, if you create a new alias of support@yourbiz.com under your primary work email account, all emails that are sent to support@yourbiz.com will go directly to your primary inbox. This is handy if you want to have a public facing email address on your site but you don’t want it to show your name.
Now …. depending on your preference, you still may want to create a separate email account for support@yourbiz.com or billing@yourbiz.com even if you are the only one in your business.
The reason why you may want to separate accounts is because at some point you may want to hire an employee or contractor to handle these responsibilities and respond to these emails.
When you do that, it will be better to hand that person access to the email account with all the history of communication in that inbox. You can always create a separate email account when you hire that person, but you won’t be able to untangle any historical emails that have been sent to that address prior to them coming on board your team if you are using an alias.
If you are concerned about having too many email accounts to manage, remember this:
You can add as many email accounts as you want to Thunderbird and respond to multiple inboxes at once all from the same email client. If you add all of your emails to Thunderbird, you won’t have to remember the passwords to all of them. The credentials will be saved in Thunderbird and all you have to do is open the application to log into all of them at once.
Mobile Client for Business Email Account
By now you probably have a good idea of how to add your email account to an email client using the credentials and configuration provided by your web hosting provider.
The process for mobile is really no different. In fact, if you’re reading this my guess is that there is a 99% chance you have already added an email account in the past to the mail client on your mobile phone (whether you use iPhone or Android).
If you prefer the mail client on iPhone (or gmail client on Android), then go ahead and add the new email account that you created for your business to mobile.
The only difference will be that you will have to configure the account manually exactly as you did on the desktop client for Thunderbird. You need to give the the client the address of the hosting server provided by your hosting account (which will not be the same domain as your business email).
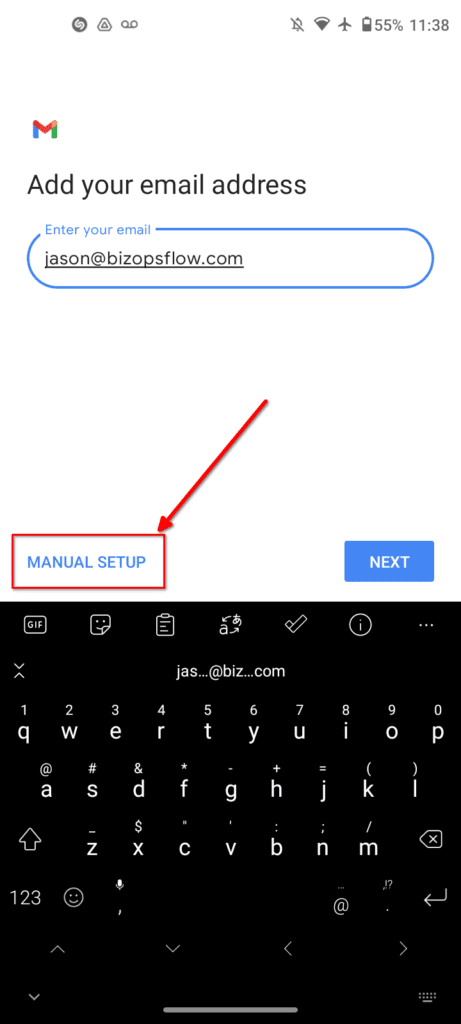
Go into your mobile email client and under settings, click on “add account”. Depending on the client, it will give you automated configurations for gmail, yahoo, aol and other common email services. You will have to configure yours manually so look for the option of “manual setup” as shown below. It might be slightly different on iPhone but the process will be more or less the same.
Note: the manual setup option will not appear until you type in your email address with your business domain and the client recognizes that it is not one of the common email providers (Gmail, Yahoo, etc.)
From here, you follow the same steps that you did for Thunderbird desktop. Put in the server name provided by your web hosting provider.
Free & Open Source Mobile Email Client
If you like the idea of using a free and open source software (FOSS) email client as you did with Thunderbird and want the same on mobile, I only have good news for your if you use an android phone.
The most common “FOSS” email client that has been around for years is called K-9. It is an excellent client and recently Thunderbird announced that they are acquiring / merging with K-9 and soon it will be called Thunderbird Mobile. This is great news because K-9 will now have the sponsorship of the Mozilla foundation and it means that it will not be discontinued any time soon.